
Spring Roll Recipe
Spring rolls are a culinary treasure, beloved for their irresistible combination of crispy, golden wrappers and flavorful fillings. These bite-sized delights are not only versatile, allowing for a range of fillings, but also incredibly satisfying. Whether served as an appetizer, a party snack, or even a light meal, homemade spring rolls bring a sense of accomplishment and delight to any occasion. The joy of biting into a perfectly crispy spring roll, with the savory filling bursting with flavor, is a culinary experience that never disappoints.

Ingredients Breakdown: The Building Blocks of Perfect Spring Rolls
The magic of spring rolls lies in the harmony of their ingredients, each playing a vital role in creating the perfect bite.
Filling: The heart of any spring roll is its filling, which can be customized to suit different tastes and dietary preferences. Whether you choose pork, chicken, or turkey, the minced meat serves as a robust base that carries the flavors of the other ingredients. The inclusion of shiitake mushrooms, especially the dried ones rehydrated in boiling water, adds a deep umami flavor that elevates the filling to new heights. The mushrooms, combined with shredded carrot, green cabbage, and bean sprouts, create a texture that is both crunchy and tender, offering a delightful contrast in every bite.
Spring Roll Wrappers: The choice of wrapper is crucial to achieving the desired texture. Traditional spring roll wrappers are thin, allowing for a crisp exterior when fried. Egg roll wrappers, which are slightly thicker, result in a heartier roll with a chewier bite. The size of the wrapper also matters; larger wrappers are perfect for generous rolls, while smaller ones are ideal for bite-sized appetizers. Selecting the right wrapper ensures that your spring rolls not only taste great but also have the perfect texture.
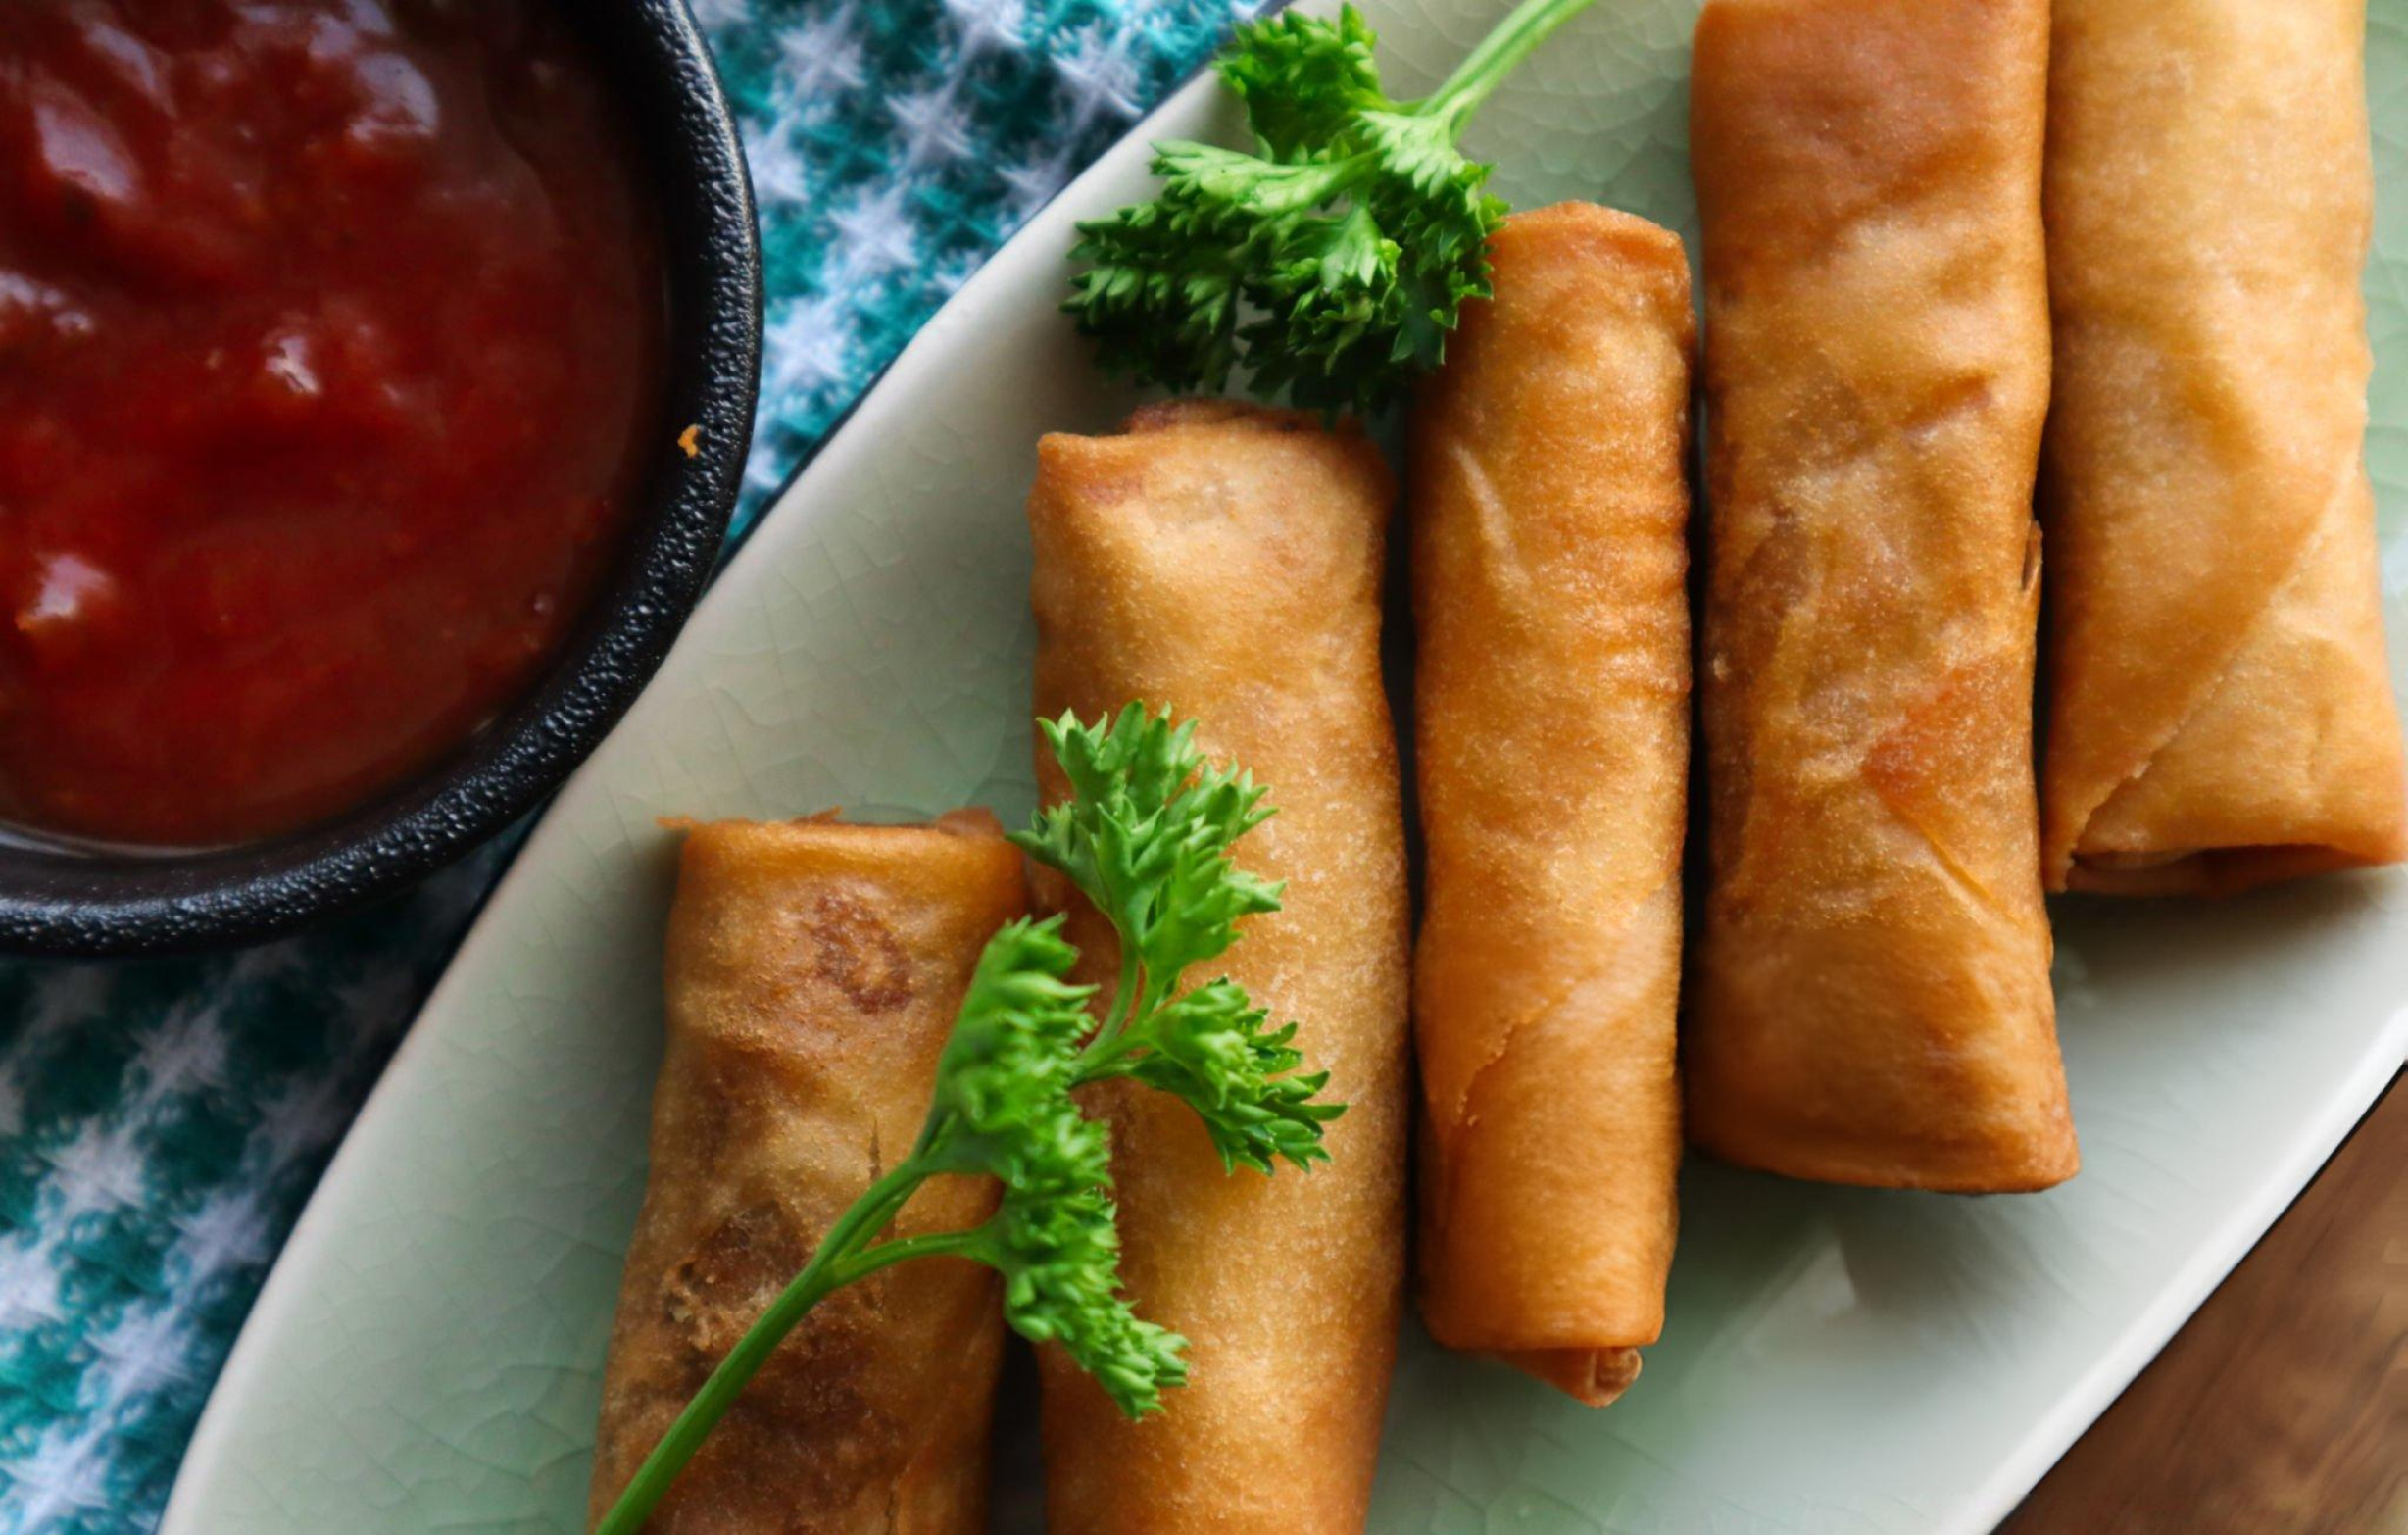
Sweet and Sour Sauce: No spring roll is complete without a dipping sauce, and the classic sweet and sour sauce is a must-have. The balance of tangy apple cider vinegar, sweet brown sugar, and savory soy sauce creates a complex flavor profile that complements the richness of the spring rolls. The ketchup adds a touch of sweetness and color, while the cornstarch helps thicken the sauce to a consistency that clings beautifully to the crispy rolls.
Step-by-Step Guide to Preparing the Filling
The key to a successful spring roll lies in the preparation of its filling, where each step contributes to the final taste and texture.
Sautéing the Meat and Garlic: Begin by heating oil in a skillet or wok over high heat. Add finely chopped garlic, allowing its aroma to release as it sizzles. Quickly add the minced meat, breaking it up with a spatula to ensure even cooking. Cook the meat until it turns white, which indicates that it’s cooked through but still moist.
Adding the Vegetables: Once the meat is cooked, it’s time to add the vegetables. The shredded carrots, cabbage, and soaked shiitake mushrooms are added in succession, with each vegetable contributing its unique texture. The sautéing process should be brief—around three minutes—just enough to wilt the vegetables while retaining their crunch. This ensures that the filling remains light and not overly cooked.
Creating the Perfect Consistency: The final step in preparing the filling is to season it with soy sauce, oyster sauce, and a touch of cornstarch. These ingredients not only enhance the flavor but also bind the filling together, giving it a slightly sticky texture. This is crucial because a well-bound filling is easier to roll and less likely to cause the spring rolls to become soggy.
Mastering the Art of Rolling Spring Rolls
Creating perfectly rolled spring rolls requires a bit of technique, but with practice, it becomes second nature.
Handling the Wrappers: Spring roll wrappers are delicate and can dry out quickly, so it’s important to keep them covered with a damp towel while working. When ready to roll, lay one wrapper on a flat surface with the smooth side down, which helps the wrapper adhere better as you roll.
Filling and Rolling Technique: Place a heaped spoonful of the prepared filling near the bottom corner of the wrapper. Begin rolling tightly, stopping halfway to fold in the sides. This folding technique creates a neat, enclosed package that prevents the filling from spilling out during cooking. Continue rolling to the top, sealing the edge with a paste made from cornstarch and water. The goal is to create a uniform roll that’s tightly sealed, ensuring even cooking.
Sealing the Rolls: Properly sealed rolls are key to achieving a perfect fry or bake. The cornstarch paste acts as glue, holding the wrapper in place and preventing it from unraveling during cooking. This step cannot be overlooked, as loose rolls will burst open, ruining the texture and presentation.
Cooking Methods: Frying vs. Baking
The cooking method you choose will significantly impact the final texture of your spring rolls.
Frying for a Classic Crunch: Deep frying is the traditional method, resulting in an irresistibly crispy exterior. Heat enough oil in a wok or deep saucepan to fully submerge the rolls. Fry the rolls in small batches to avoid overcrowding, which can cause the oil temperature to drop. The rolls should be fried until they reach a deep golden color, which typically takes around 1 1/2 to 2 minutes. The result is a perfectly crisp roll that’s light and crunchy.
Baking for a Healthier Option: For a lighter alternative, baking is a great option that still delivers a satisfying crunch. Place the rolls on a wire rack set over a baking tray to allow air to circulate around them, ensuring even cooking. Generously spray the rolls with oil to help them achieve a golden, crispy exterior. Bake at 200°C/400°F for 20 to 25 minutes, turning them halfway through if desired, although it’s not necessary. Baking offers a healthier, less greasy option without sacrificing flavor or texture.
Recipe Tips & Frequently Asked Questions
Preventing Soggy Spring Rolls:
- Cool the filling before rolling to prevent the wrappers from becoming soggy.
- Avoid overfilling the rolls, as this can cause them to burst during cooking.
Achieving Even Cooking:
- Maintain a consistent oil temperature when frying to ensure the rolls cook evenly and don’t absorb too much oil.
- For baking, use a wire rack to promote even airflow around the rolls, ensuring they crisp up evenly.
Storage and Reheating:
- Store leftover spring rolls in an airtight container in the refrigerator. Reheat in the oven to restore crispiness.
Can I Freeze Spring Rolls?
- Yes, you can freeze spring rolls before or after cooking. For uncooked rolls, freeze them in a single layer on a baking sheet before transferring them to a freezer bag. Cooked rolls can be frozen and reheated in the oven.
What Other Fillings Can I Use?
- Spring rolls are incredibly versatile. You can experiment with fillings like shrimp, tofu, or even a combination of vegetables for a vegetarian option. The key is to ensure the filling is not too wet.
How Can I Make Gluten-Free Spring Rolls?
- For gluten-free spring rolls, use rice paper wrappers or look for gluten-free spring roll wrappers available at some specialty stores. Make sure the soy sauce and oyster sauce are also gluten-free.
What to Serve With This Recipe: Complementary Dishes and Sauces
Spring rolls are wonderfully versatile and pair well with a variety of dipping sauces and side dishes.
Dipping Sauces: While sweet and sour sauce is a classic, spring rolls also pair beautifully with other dipping sauces. Consider serving them with a peanut sauce for a creamy, nutty flavor, or a spicy chili sauce for those who enjoy a bit of heat. Each sauce brings out different aspects of the spring rolls’ flavors, allowing you to customize the experience.
Side Dishes: For a complete meal, serve spring rolls with a side of light cucumber salad, which offers a refreshing contrast to the rich, savory rolls. Alternatively, steamed jasmine rice provides a neutral base that complements the flavors without overwhelming them. These sides add balance to the meal, making it both satisfying and well-rounded.
Ingredients
Filling:
- 6 dried shiitake mushrooms soaked in boiling water OR 8 fresh (Note 1)
- 1 tbsp oil
- 2 garlic cloves, finely chopped or minced
- 400 g / 13 oz pork mince (ground pork), or chicken or turkey
- 1 1/2 cups shredded carrot (1 large or 2 small)
- 1 1/2 cups (packed) shredded green cabbage (any type is fine)
- 1 1/2 cups (heaped) bean sprouts
- 1 1/2 tbsp Oyster Sauce
- 2 tsp soy sauce (light or all-purpose is best, dark is also okay)
- 1 tsp cornflour / cornstarch
Spring Rolls:
- 15 – 20 spring roll wrappers, defrosted (21.5 cm / 8” squares) OR 35 – 40 small spring roll wrappers (Note 2), or Egg Roll wrappers to make Egg Rolls (Note 6)
- 2 tsp cornflour (for sealing rolls)
- 1 tbsp water (for sealing rolls)
- Oil for frying (vegetable oil is ideal) OR oil spray for baking (canola is a good choice)
Sweet and Sour Sauce (makes ~ 2/3 cup):
- 2 tsp cornflour/cornstarch
- 2 tbsp water
- ½ cup apple cider vinegar
- 1/3 cup brown sugar (adjust to taste)
- 2 tbsp tomato ketchup
- 2 tsp soy sauce
Instructions
FILLING: In a skillet or wok, heat oil over high heat. Toss in the garlic, giving it a quick stir, then add the minced pork. Cook the meat, breaking it into smaller pieces, until it turns white.
Next, add the shredded carrots, bean sprouts, cabbage, and mushrooms. Sauté for about 3 minutes or until the vegetables soften and wilt. Stir in the cornflour, soy sauce, and Oyster sauce, and continue cooking for another minute until the liquid evaporates and the filling becomes slightly sticky, ensuring it’s not watery to avoid soggy spring rolls. Allow the filling to cool—speed this up by spreading it on a tray and refrigerating for 5 minutes. Cooling the filling prevents the spring rolls from bursting during cooking.
SPRING ROLL: In a small bowl, mix the cornflour and water to create a paste for sealing the rolls.
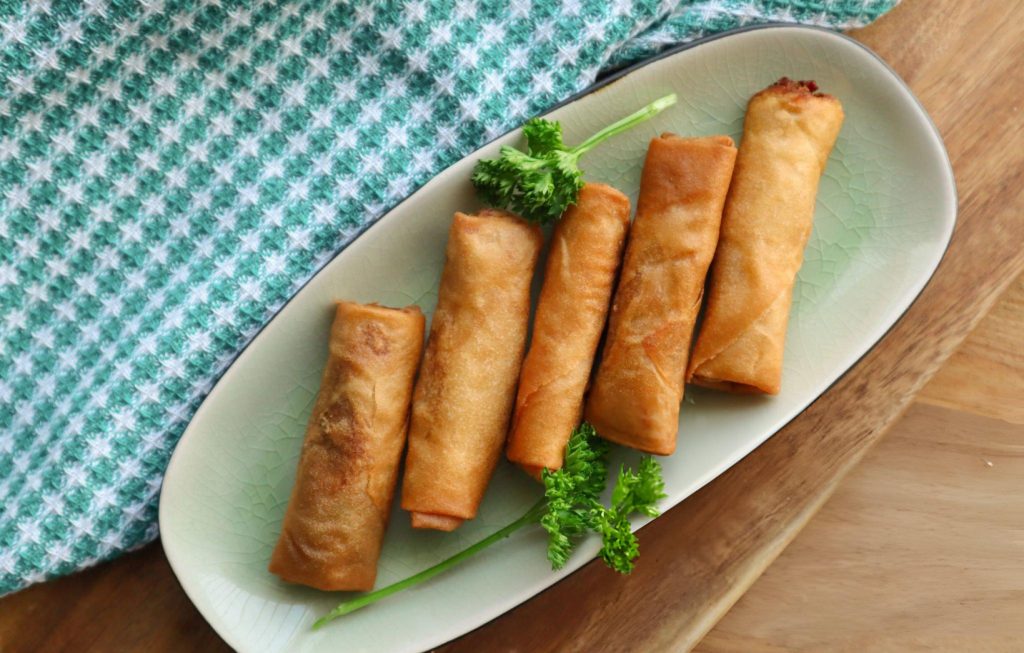
Carefully separate one spring roll wrapper, keeping the others covered with a damp tea towel to prevent drying. Lay the wrapper on a flat surface with the smooth side facing down, positioned like a diamond. Place a generously heaped dessert spoonful of filling near the bottom. Begin rolling tightly halfway, fold in the sides, then continue rolling to the top. Use the cornflour paste to seal the edges. The final rolls should measure approximately 12 cm / 5” in length and 2.5 cm / 1” in width.
Heat enough oil in a wok or deep saucepan so that the spring rolls are fully submerged when frying. Heat the oil over medium-high heat until hot—test by dipping a bamboo chopstick or wooden spoon handle in; if bubbles form rapidly, the oil is ready.
Carefully lower the spring rolls into the hot oil, cooking 4 to 5 at a time. Fry, turning occasionally, until they achieve a deep golden color, which takes around 1 1/2 to 2 minutes. Transfer to paper towels to drain excess oil.
Repeat the process with the remaining spring rolls. Serve them hot, paired with the Sweet and Sour Sauce.
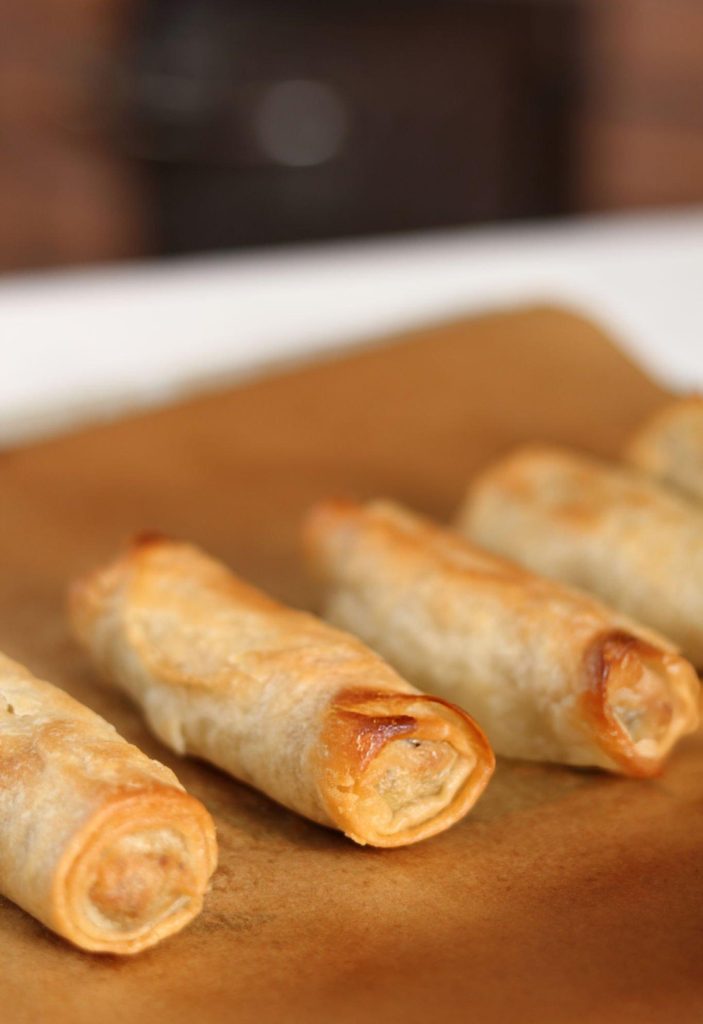
BAKING option: For a baked alternative, arrange the spring rolls on a wire rack placed over a baking tray. Generously spray the rolls with oil on all sides. Bake at 200°C/400°F (standard) or 180°C/350°F (fan/convection) for 20 to 25 minutes until they turn golden and crispy. There’s no need to flip them during baking.
SWEET and SOUR SAUCE: In a small saucepan, combine all the sauce ingredients over medium heat. Bring to a simmer, stirring frequently, and cook until the sauce thickens to your desired consistency, about 3 to 5 minutes.
Spring Roll Recipe
Ingredients
Filling:
- 6 dried shiitake mushrooms soaked in boiling water OR 8 fresh Note 1
- 1 tbsp oil
- 2 garlic cloves finely chopped or minced
- 400 g / 13 oz pork mince ground pork, or chicken or turkey
- 1 1/2 cups shredded carrot 1 large or 2 small
- 1 1/2 cups packed shredded green cabbage (any type is fine)
- 1 1/2 cups heaped bean sprouts
- 1 1/2 tbsp Oyster Sauce
- 2 tsp soy sauce light or all-purpose is best, dark is also okay
- 1 tsp cornflour / cornstarch
Spring Rolls:
- 15 – 20 spring roll wrappers defrosted (21.5 cm / 8” squares) OR 35 – 40 small spring roll wrappers (Note 2), or Egg Roll wrappers to make Egg Rolls (Note 6)
- 2 tsp cornflour for sealing rolls
- 1 tbsp water for sealing rolls
- Oil for frying vegetable oil is ideal OR oil spray for baking (canola is a good choice)
Sweet and Sour Sauce (makes ~ 2/3 cup):
- 2 tsp cornflour/cornstarch
- 2 tbsp water
- ½ cup apple cider vinegar
- 1/3 cup brown sugar adjust to taste
- 2 tbsp tomato ketchup
- 2 tsp soy sauce
Instructions
FILLING:
- In a skillet or wok, heat oil over high heat. Toss in the garlic, giving it a quick stir, then add the minced pork. Cook the meat, breaking it into smaller pieces, until it turns white.
- Next, add the shredded carrots, bean sprouts, cabbage, and mushrooms. Sauté for about 3 minutes or until the vegetables soften and wilt. Stir in the cornflour, soy sauce, and Oyster sauce, and continue cooking for another minute until the liquid evaporates and the filling becomes slightly sticky, ensuring it’s not watery to avoid soggy spring rolls. Allow the filling to cool—speed this up by spreading it on a tray and refrigerating for 5 minutes. Cooling the filling prevents the spring rolls from bursting during cooking.
SPRING ROLL:
- In a small bowl, mix the cornflour and water to create a paste for sealing the rolls.
- Carefully separate one spring roll wrapper, keeping the others covered with a damp tea towel to prevent drying. Lay the wrapper on a flat surface with the smooth side facing down, positioned like a diamond. Place a generously heaped dessert spoonful of filling near the bottom. Begin rolling tightly halfway, fold in the sides, then continue rolling to the top. Use the cornflour paste to seal the edges. The final rolls should measure approximately 12 cm / 5” in length and 2.5 cm / 1” in width.
- Heat enough oil in a wok or deep saucepan so that the spring rolls are fully submerged when frying. Heat the oil over medium-high heat until hot—test by dipping a bamboo chopstick or wooden spoon handle in; if bubbles form rapidly, the oil is ready.
- Carefully lower the spring rolls into the hot oil, cooking 4 to 5 at a time. Fry, turning occasionally, until they achieve a deep golden color, which takes around 1 1/2 to 2 minutes. Transfer to paper towels to drain excess oil.
- Repeat the process with the remaining spring rolls. Serve them hot, paired with the Sweet and Sour Sauce.
BAKING option:
- For a baked alternative, arrange the spring rolls on a wire rack placed over a baking tray. Generously spray the rolls with oil on all sides. Bake at 200°C/400°F (standard) or 180°C/350°F (fan/convection) for 20 to 25 minutes until they turn golden and crispy. There’s no need to flip them during baking.
SWEET and SOUR SAUCE:
- In a small saucepan, combine all the sauce ingredients over medium heat. Bring to a simmer, stirring frequently, and cook until the sauce thickens to your desired consistency, about 3 to 5 minutes.
Notes
- Shiitake Mushrooms: Rehydrate dried shiitake mushrooms by soaking them in plenty of boiled water for about 20 minutes, or until they soften (skip this step if using fresh mushrooms). Once rehydrated, drain and squeeze out the excess water as if squeezing a sponge, then finely chop. Dried shiitake mushrooms, found in Asian grocery stores and the Asian section of some supermarkets in Australia, offer a more concentrated mushroom flavor similar to porcini mushrooms, adding a rich umami to your dish. If using fresh mushrooms, finely chop them and add them before the carrots to ensure they cook thoroughly and release all their moisture (since a wet filling can cause spring rolls to burst).
- Spring Roll Wrappers: Spring roll wrappers can be easily found in the frozen section of Australian supermarkets like Woolies, Coles, and Harris Farms. These wrappers are typically made from wheat. Alternatively, you can use rice paper wrappers, commonly used for Vietnamese Rice Paper Rolls, but they must be soaked first before wrapping. Rice paper wrappers will yield crispy rolls with a bubbly, semi-transparent surface, similar to Crispy Rice Paper Fish Parcels.
- Wrapper Handling: When handling the wrappers, note that one side is slightly rough while the other is smoother. For the best presentation, wrap with the smooth side facing outwards—though this isn’t crucial to the final product. 😊
- Oil Usage in Woks: Woks are more efficient for frying because their shape allows for more surface area while using less oil compared to a saucepan or skillet.
- Frying vs. Baking: Check the photos in the post for a comparison between baked and fried spring rolls—they look quite similar! Frying produces a more delicate, crispy, and flaky texture, which is traditional for spring rolls. Baking, while still resulting in crispy rolls, offers a slightly different texture where the wrapper’s flavor is more pronounced. If baking, be sure to spray the rolls very generously with oil! If you’re not using a rack, flip the rolls after about 15 minutes.
- Make-Ahead/Freezing: To prepare in advance, freeze the spring rolls before cooking and cook them straight from frozen. It’s best to serve them freshly cooked, so avoid storing cooked rolls.
- Nutrition Information: The estimated nutrition per spring roll (excluding sauce) is conservative, assuming about 1 teaspoon of oil per roll, which is likely on the lower side since the wrapper doesn’t absorb much oil and the filling remains non-greasy. Other sources suggest around 150 calories per spring roll.