
Rainbow Cake Recipe
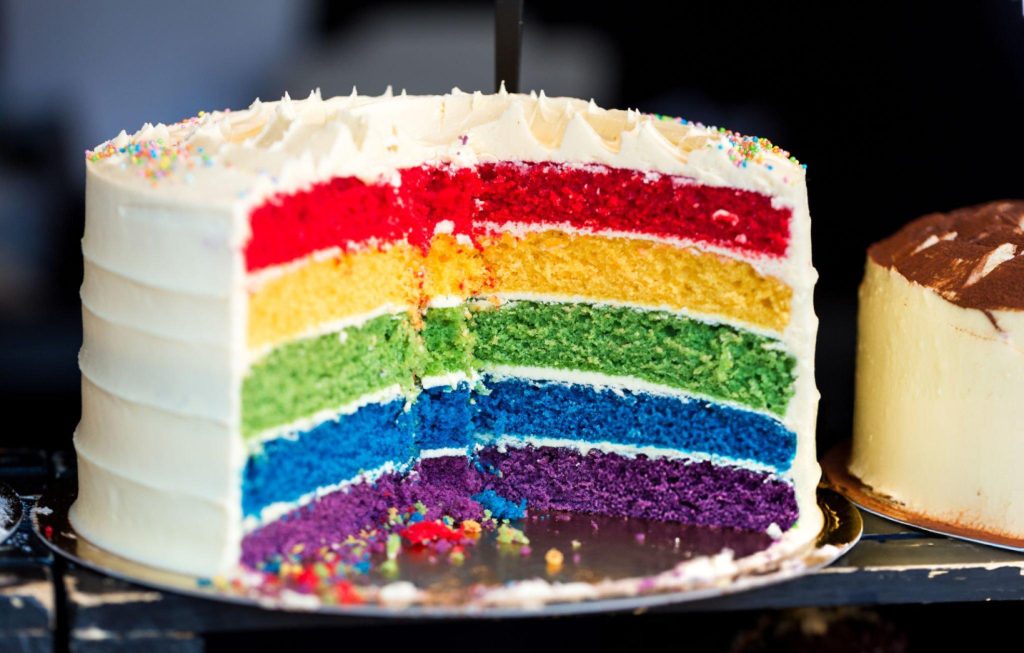
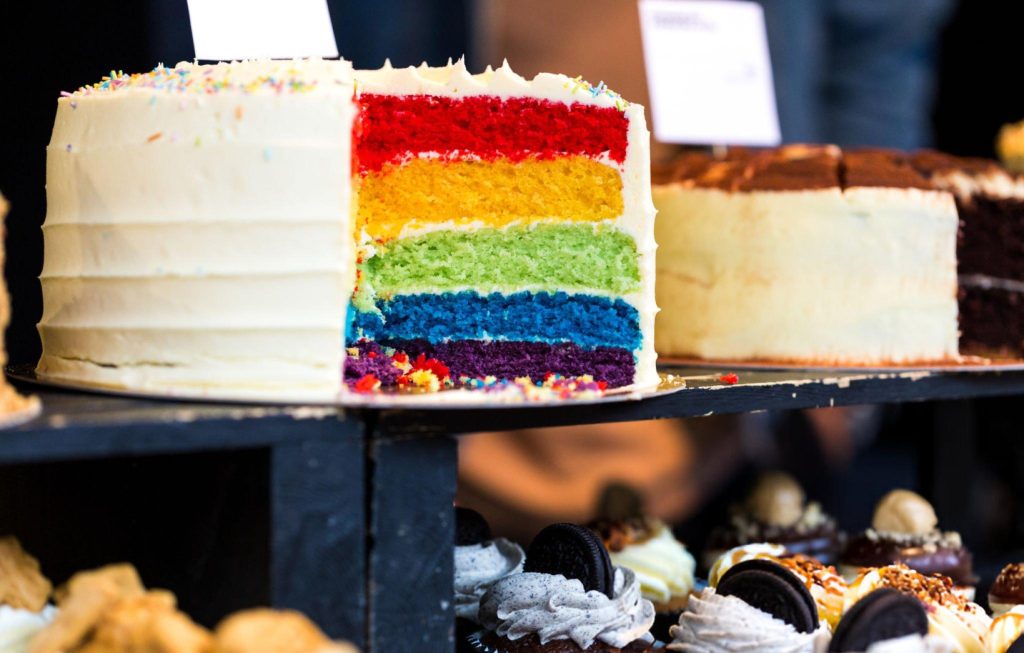
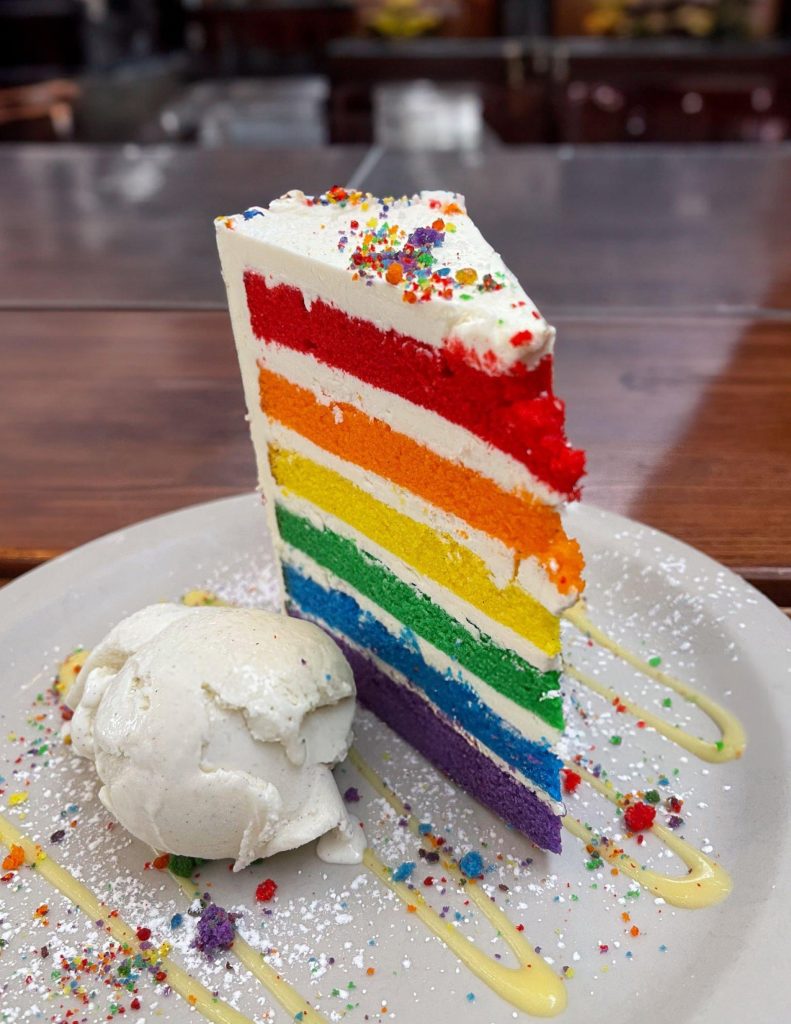
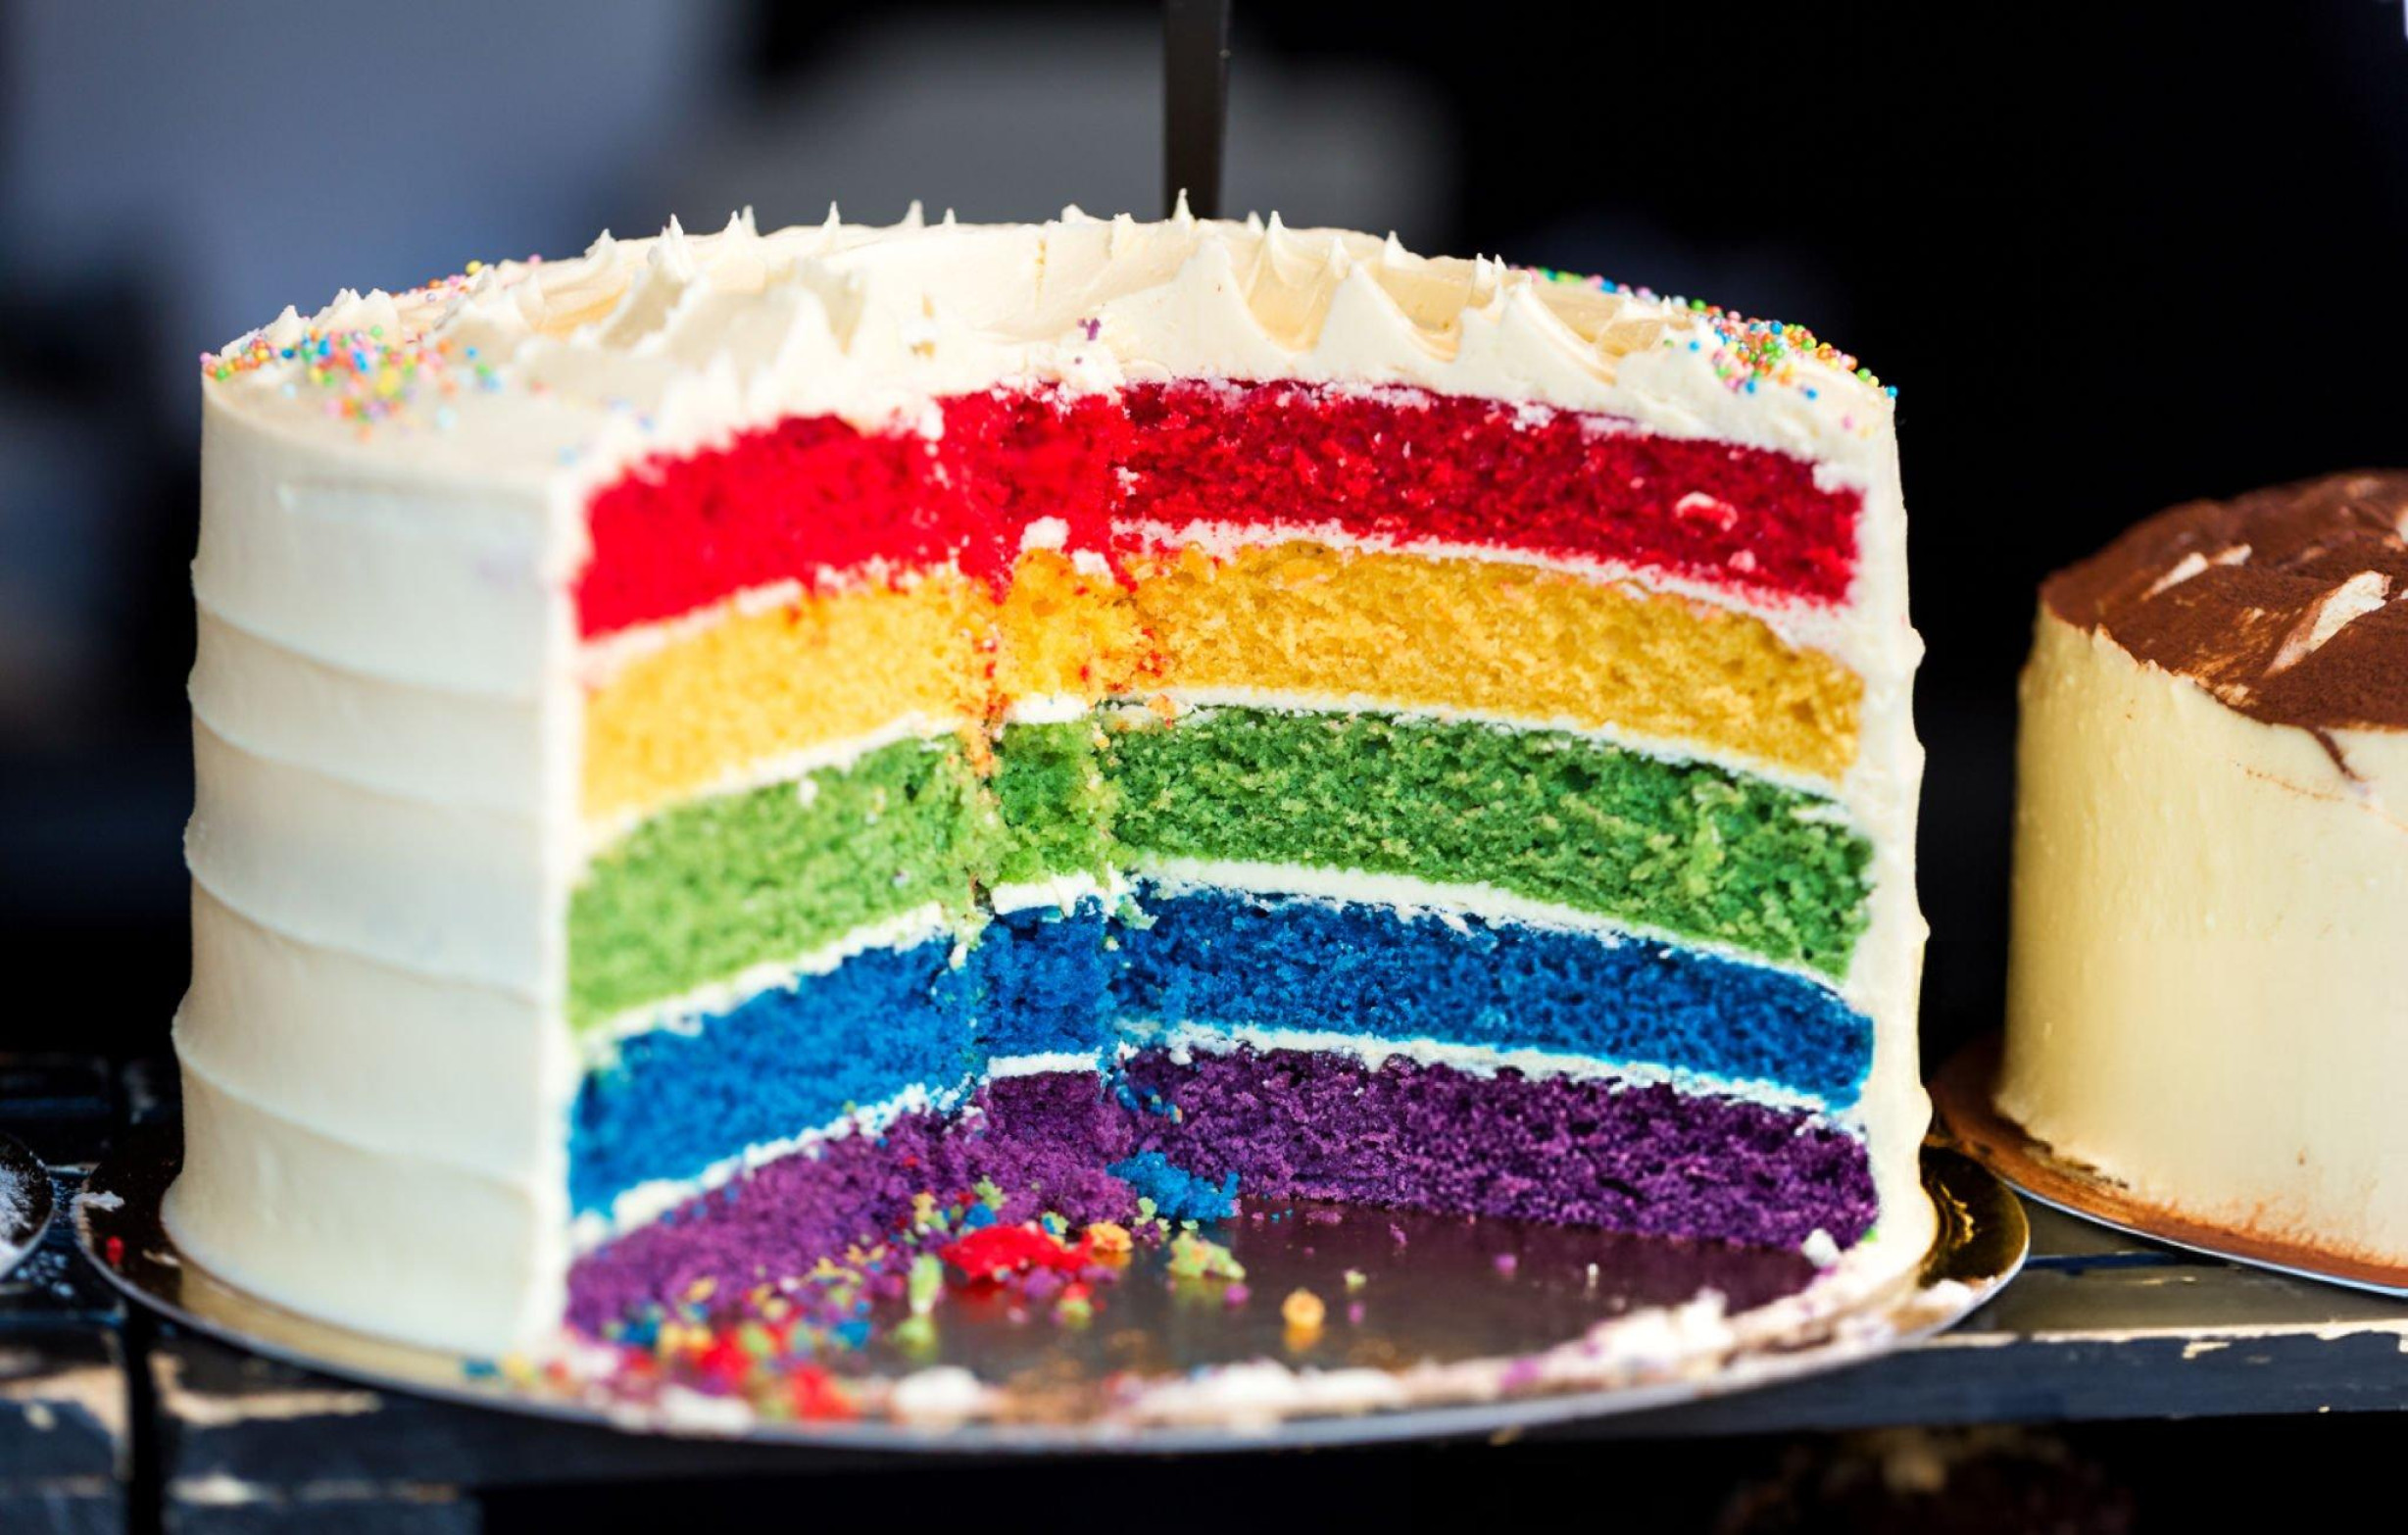
A rainbow cake is more than just a dessert—it’s a statement of joy, celebration, and vibrant creativity. With its striking layers of bold colors and creamy frosting, this cake makes any occasion extra special, whether it’s a birthday, a festive gathering, or simply a day that deserves a bit more color. Its whimsical appearance is matched by its rich flavors, making it as delightful to eat as it is to look at.
Ingredients Breakdown
Each element of this rainbow cake plays a vital role in ensuring the perfect outcome—both in texture and taste.
For the cake layers, the all-purpose flour provides the structural base, while the granulated sugar adds sweetness and contributes to the cake’s moistness. The baking powder and baking soda are responsible for the light, airy texture of the cake, ensuring each layer rises beautifully. Eggs are essential for binding the ingredients together, adding richness and providing stability to the cake’s structure. The vegetable oil keeps the cake moist, creating a soft crumb that contrasts perfectly with the creamy buttercream. Whole milk not only adds moisture but also helps to bind the dry ingredients with the wet, ensuring a smooth batter. Vanilla extract infuses the cake with subtle warmth and flavor, while the vibrant food coloring transforms the simple cake into a kaleidoscope of hues.
For the buttercream, unsalted butter provides the silky base for this luxurious frosting. It is whipped until fluffy, with the addition of a pinch of salt to balance the sweetness. The large amount of confectioners’ sugar gives the buttercream its signature sweetness and sturdy texture. The cream adds richness and helps to achieve the perfect smooth consistency, while the vanilla extract rounds out the flavor, adding a gentle hint of warmth to the buttercream that complements the cake layers perfectly.
Step-by-Step Instructions
The magic of a rainbow cake lies in the detailed, step-by-step process of creating its vibrant layers and creamy frosting.
Preparing the Cake Layers
Start by preheating your oven to 350°F (175°C) and preparing the cake pans. Grease two or three 8-inch round pans with baking spray or butter, then line the bottoms with parchment paper to ensure an easy release later. Sift together the dry ingredients—flour, sugar, baking powder, baking soda, and salt—to ensure they are evenly distributed. In another bowl, whisk together the wet ingredients: eggs, vegetable oil, milk, and vanilla extract. Slowly pour the wet mixture into the dry ingredients, whisking continuously until the batter is smooth and lump-free.
Now comes the fun part—divide the batter into six bowls and color each one using food coloring to create the rainbow effect. Stir the colors until they are evenly mixed into the batter. Pour one colored batter into each cake pan. If you don’t have enough pans for all the colors, refrigerate the extra bowls while the first batch bakes. Bake each layer for about 20 minutes, or until a toothpick inserted in the center comes out clean. Let the cakes cool in the pans for 10 minutes before transferring them to a wire rack.
Making the Buttercream Frosting
To achieve the perfect buttercream, begin by beating the softened butter and salt for about five minutes. This step ensures the butter becomes fluffy and light, setting the foundation for the frosting’s creamy texture. Gradually add the confectioners’ sugar, mixing on low speed to prevent a sugar cloud. Add the cream slowly, one tablespoon at a time, as you mix. The cream helps the buttercream achieve the right consistency—creamy but sturdy. Finally, mix in the vanilla extract, and whip the frosting until it is fluffy and smooth.
Assembling the Cake
To assemble, start by carefully peeling the parchment paper off each cake layer. Place the purple layer on a cake stand or plate, and spread a generous ½ cup of frosting over the top. Continue layering with blue, green, yellow, orange, and red, spreading frosting between each layer. Once all the layers are stacked, frost the entire outside of the cake with the remaining buttercream, ensuring it is smooth and even. Refrigerate the cake for at least an hour before slicing to allow the layers to set.
Recipe Tips
Vibrant Colors:
For the boldest colors, use gel food coloring rather than liquid, as it provides more intense pigmentation without altering the batter’s consistency.
Even Baking:
Ensure each layer is evenly distributed in the pans. You can use a kitchen scale to divide the batter equally.
Buttercream Texture:
If the buttercream becomes too stiff, add a bit more cream. If it’s too soft, chill it for a few minutes before frosting the cake.
What to Serve with This Recipe
A rainbow cake is best paired with light, refreshing accompaniments that contrast its richness. Freshly sliced fruit such as strawberries, raspberries, or kiwi adds a burst of freshness that complements the cake’s sweetness. For an extra indulgence, serve with a scoop of vanilla or strawberry ice cream. Drinks like lemonade, fruit punch, or even a light rosé wine can enhance the overall experience, especially for a summer celebration.
For themed parties, consider serving the rainbow cake with a matching colorful setup—rainbow napkins, colorful balloons, and even bright fruit skewers to tie everything together.
Storage and Leftover Tips
This cake can be stored at room temperature for up to three days, as long as it’s covered tightly to maintain its moisture. If you want to extend its shelf life, wrap the cake tightly in plastic wrap and store it in the refrigerator for up to five days. To freeze the cake layers or buttercream, wrap each layer individually in plastic wrap and place them in an airtight container. The layers will stay fresh in the freezer for up to two months. Thaw them at room temperature before assembling.
Frequently Asked Questions
How can I make the cake layers even if I don’t have enough pans?
Simply refrigerate the extra batter while the first layers bake. This prevents the batter from losing its rise and keeps the colors vibrant.
What’s the best type of food coloring to use for vibrant hues?
Gel food coloring is ideal because it provides intense colors without thinning the batter.
Can I make the buttercream in advance, and how should I store it?
Yes, you can make the buttercream ahead of time. Store it in an airtight container in the refrigerator for up to three days. When ready to use, bring it to room temperature and whip it again to restore its smooth consistency.
Customization Ideas
Personalizing a rainbow cake can be as fun as making it. For a flavor twist, add a hint of citrus zest, such as lemon or orange, to the cake batter for a refreshing burst of flavor. You can also experiment with flavor extracts like almond, coconut, or even lavender for a unique spin.
For a decorative touch, top the cake with colorful sprinkles, edible glitter, or candy rainbows. The buttercream can also be tinted with pastel shades for a softer, more whimsical look. You could even alternate between different frosting flavors between layers—think chocolate ganache or strawberry buttercream for an extra layer of flavor.
Ingredients
For the Rainbow Cake Layers:
1 tablespoon vanilla extract
1½ cups whole milk
6 large eggs, at room temperature
1½ cups vegetable oil
3 cups granulated sugar
5 cups all-purpose flour
1 tablespoon baking powder
½ teaspoon baking soda
1 teaspoon salt
Food coloring (red, yellow, blue, green)
For the Buttercream:
2½ cups unsalted butter, softened
½ teaspoon salt
10 cups confectioners’ sugar
½ cup cream, at room temperature
2 teaspoons vanilla extract
Instructions
For the Rainbow Cake Layers:
Preheat your oven to 350°F (175°C). Prepare two or three 8-inch round cake pans by greasing them with baking spray or butter, then lining the bases with parchment paper to ensure easy release.
In a large mixing bowl, sift together the flour, sugar, baking powder, baking soda, and salt until well combined.
In a separate bowl, whisk the eggs, vegetable oil, milk, and vanilla extract until the mixture is smooth and well blended. Gradually pour this wet mixture into the dry ingredients, whisking until the batter is lump-free and consistent.
Divide the batter evenly among six bowls. Add food coloring to each bowl to create the different colors: red, orange, yellow, green, blue, and purple. Stir until the color is evenly distributed in each batch. Pour one colored batter into a prepared cake pan. Keep the remaining bowls in the fridge until you are ready to bake them. This will prevent premature activation of the baking powder.
Bake each layer for approximately 20 minutes or until a toothpick inserted into the center comes out clean. Allow the cakes to cool in the pans for 10 minutes before transferring them to a wire rack to cool completely. Repeat the process for the remaining batters, ensuring you re-grease and line the pans between batches.
For the Buttercream:
In a stand mixer fitted with the whisk attachment or a large bowl using a hand mixer, beat the softened butter and salt on medium speed for about 5 minutes, until the butter is fluffy and has a pale color.
Gradually incorporate the confectioners’ sugar, adding it one cup at a time while also adding a tablespoon of cream between additions. Continue mixing on low speed to avoid a sugar cloud. Occasionally, pause to scrape down the sides of the bowl for even mixing. Once all the sugar is incorporated, add the vanilla extract and mix in additional cream if needed to achieve a smooth, non-grainy texture. Turn up the mixer to medium-low and beat for another minute until the frosting is light and airy.
For the Assembly:
Carefully peel off the parchment paper from each cake layer. Place the purple cake layer on your serving plate or cake stand. Spread ½ cup of frosting evenly over the top of this layer. Next, place the blue layer on top, adding another ½ cup of frosting. Continue this layering process with the green, yellow, orange, and finally the red cake layer.
Once all the layers are assembled, use the remaining frosting to coat the sides and top of the cake thoroughly. Smooth the frosting to create an even surface. Chill the cake for at least an hour before slicing and serving. Store any leftovers at room temperature, covered, for up to three days.
Rainbow Cake Recipe
Ingredients
For the Rainbow Cake Layers:
- 1 tablespoon vanilla extract
- 1½ cups whole milk
- 6 large eggs at room temperature
- 1½ cups vegetable oil
- 3 cups granulated sugar
- 5 cups all-purpose flour
- 1 tablespoon baking powder
- ½ teaspoon baking soda
- 1 teaspoon salt
- Food coloring red, yellow, blue, green
For the Buttercream:
- 2½ cups unsalted butter softened
- ½ teaspoon salt
- 10 cups confectioners’ sugar
- ½ cup cream at room temperature
- 2 teaspoons vanilla extract
Instructions
For the Rainbow Cake Layers:
- Preheat your oven to 350°F (175°C). Prepare two or three 8-inch round cake pans by greasing them with baking spray or butter, then lining the bases with parchment paper to ensure easy release.
- In a large mixing bowl, sift together the flour, sugar, baking powder, baking soda, and salt until well combined.
- In a separate bowl, whisk the eggs, vegetable oil, milk, and vanilla extract until the mixture is smooth and well blended. Gradually pour this wet mixture into the dry ingredients, whisking until the batter is lump-free and consistent.
- Divide the batter evenly among six bowls. Add food coloring to each bowl to create the different colors: red, orange, yellow, green, blue, and purple. Stir until the color is evenly distributed in each batch. Pour one colored batter into a prepared cake pan. Keep the remaining bowls in the fridge until you are ready to bake them. This will prevent premature activation of the baking powder.
- Bake each layer for approximately 20 minutes or until a toothpick inserted into the center comes out clean. Allow the cakes to cool in the pans for 10 minutes before transferring them to a wire rack to cool completely. Repeat the process for the remaining batters, ensuring you re-grease and line the pans between batches.
For the Buttercream:
- In a stand mixer fitted with the whisk attachment or a large bowl using a hand mixer, beat the softened butter and salt on medium speed for about 5 minutes, until the butter is fluffy and has a pale color.
- Gradually incorporate the confectioners’ sugar, adding it one cup at a time while also adding a tablespoon of cream between additions. Continue mixing on low speed to avoid a sugar cloud. Occasionally, pause to scrape down the sides of the bowl for even mixing. Once all the sugar is incorporated, add the vanilla extract and mix in additional cream if needed to achieve a smooth, non-grainy texture. Turn up the mixer to medium-low and beat for another minute until the frosting is light and airy.
For the Assembly:
- Carefully peel off the parchment paper from each cake layer. Place the purple cake layer on your serving plate or cake stand. Spread ½ cup of frosting evenly over the top of this layer. Next, place the blue layer on top, adding another ½ cup of frosting. Continue this layering process with the green, yellow, orange, and finally the red cake layer.
- Once all the layers are assembled, use the remaining frosting to coat the sides and top of the cake thoroughly. Smooth the frosting to create an even surface. Chill the cake for at least an hour before slicing and serving. Store any leftovers at room temperature, covered, for up to three days.
Notes
- If cake layers are domed, trim with a serrated knife for even stacking or use cake strips to prevent doming.
- Cake strips help cake layers rise evenly by keeping the pan’s edges cooler.
- For accuracy, measure flour with a scale. If not available, fluff flour before spooning it into a measuring cup and leveling it.
- Allow cake layers to fully cool before adding buttercream.
- Chilling the cake longer helps the buttercream adhere better to the layers.
- Use room-temperature butter for the buttercream to avoid lumps.
- Avoid over-mixing the batter to prevent a tough, dry texture.